Posts

Debugging on Class Based Testbench

Hi All, Sorry for late post, as I had been busy with some personal work. Today we'll discuss about an important article, which I came across while surfing on internet for RTL Verification. This post does not contain any technical information from my side, but this is just to share a really good stuff. In RTL verification, debugging is very much important to find out the exact bug. And sophisticated tools are available for RTL debugging. But for class based testbench, many times we don't have that previledge to check the annotation, of check the instance hierarchy or check the current value or check the schematic. More and more semiconductor firms are adopting System Verilog based verification and in special, UVM methodology. Things become more complicated, when we have a full chip verification with multiple environement/agents/drivers in the system, simultaneously communicating with the DUT and transmitting/receiving informations. So here, I am providing a link of ...

What is Formal Verification through Model Checking? [2/2]

Image
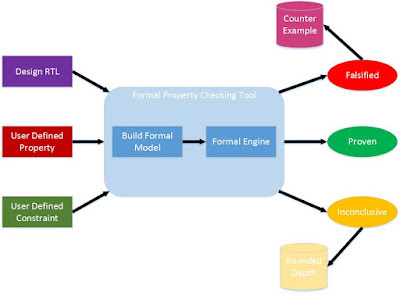
Hi All, This is the 2nd post on the Formal Verification. Here we will discuss about the remaining topics of the Formal Verification through Model Checking. Results of the Model Checking Now that, you know, that Model Checking is all about Properties, Constraints & Tool, we shall examine how tool works. Now the job of the Model Checking tool is to verify User Defined Properties exhaustively, by satisfying the User Defined Constraints. There are basically 3 types of results for any Property, Model Checking tool can give. Conclusive, Proven - Property is exhaustively verified, and you can be assured, that there is no bug in that piece of RTL. Conclusive, Falsified - Property has been failed. In this case, tool will provide you the Falsification Trace (Set of input pattern, which can make the property to fail) Inconclusive (Bounded Proof) - Tool can not confirm the proof or falsification of the property. In this case, tool will provide you the "Bounded Proof...

What is Formal Verification through Model Checking? [1/2]

Image
Hi All, Sorry for the delay in the post. But you know, good content takes it's own time ;) Today we will discuss about a relative new technology for verification, Formal Verification through Model Checking. I hope, you guys will know the fundamentals or theory of the Model Checking, by reading this post. What is Formal Verification? Before knowing about Model Checking, we must know about Formal Verification. Formal Verification is an algorithmic based approach, to logic verification, that exhaustively proves functional properties of a design. Focus is not on Stimulus, but rather correctness of the reference. Proves or disapproves, correctness of the design mathematically. Most commonly used algorithms : BDD/ROBDD, SAT Solvers (We may talk about this algorithms in subsequent blog posts) There are 2 types of the Formal Verification : Equivalance Checking  - Verifies Functional Equivalence of 2 designs, which are at smae or different abstraction level. Like R...

Standard Cell Based ASIC Design Flow

Image
Hi All,  Today we will discuss about ASIC Design Flow, as it is one of the most important and crucial thing to understand. ASIC Design Flow Now, we will try to get brief idea about each steps in the above image. Specification  - Specification of the system, like what is the functionality of system, what is the desired speed of the system, area constraint of the system, whether it has any power constraint or not, tolerances of various constraints, operative conditions of the system. RTL Description  - Generally after specification, the system is partitioned into various blocks and RTL description (HDL Code like Verilog or VHDL), mostly in behaviour form is written. Sometimes Higher Level Language Code like C/C++ is also written, and in that case, a High Level Synthesis Tool is used, which converts the Higher Language Code into RTL Level Code. After RTL Coding, Functional Verification is done to check the correctness of the functionality. Logic Synthe...

How to implement more than 1 Analysis Implementation Ports in a Class in UVM

Hi All, In this post, we will discuss about how to include more than 1 Analysis Implementation Port in a Class in UVM. Analysis Ports are used for many purposes like Coverage Collection, Received/Transmitted Packet Checking. And sometimes, you may need to take coverage on different packets (so you will require different analysis implementation ports) and you do not want to define 2 different class, just for coverage. So if there are more than 1 (suppose 2) analysis implementation ports in a class, then obvious (and the first also !!!) question arises in the mind is that, how to implement 2 write methods in the same class. Well, in UVM, we have 2 different methods to address the problem. Method - 1 : Use "imp" Suffix defined via Macro Declare Macro `uvm_analysis_imp_decl(<Postfix>) outside of the component. This macro adds post-fix to the analysis implementation port class name and associated write method. Instantiate Analysis Implementation Port with u...

Simulation Behaviour of Associative Array with 64 Bit Index - QuestaSIM

Image
Hi All, This post is related to unexpected Simulation Behaviour with an Associative Array having 64 Bit Index in QuestaSIM. I had faced this problem and thought many others may have faced it also. So it is worth sharing the solution over here. NOTE :- This behaviour was observed in QuestaSIM 10.2. It may or may not be observed in the same or other versions of QuestaSIM. SAMPLE CODE :  Here is the sample code : typedef struct packed {   bit [7:0] data;   bit        valid; } dword_memory_st; ` define key 64 program p;   int loop_count;   int iteration; // Try with more than 8 to get the Errors ;)   dword_memory_st MEMORY[ bit [`key-1:0] ];   bit [`key-1:0] st = 'hffff_ffff_ffff_fffa;   bit [`key-1:0] ft = 'hffff_ffff_ffff_ffff;    bit [`key-1:0]  temp;    bit [`key:0]  max_memory_address = (1 << `key);    bit  bounded_address_used = 0; ...